Saturday, 31 March 2018
Friday, 30 March 2018
Tuesday, 27 March 2018
Monday, 26 March 2018
Sunday, 25 March 2018

Saturday, 24 March 2018

Thursday, 22 March 2018
Tuesday, 20 March 2018
Audience Feedback

After completing the music video I exported it and uploaded to YouTube. I then got feedback on the video from the same group that saw my rough cut. This meant that I was able to get direct feedback on how the music video has improved instead of feedback I would get from first time viewers.
The biggest piece of positive feedback I received was about how I included lip syncing performance into the video. The audience believed that this really made the video more fitting as a music video and really tied it together. They said that the lip syncing looked to be smooth and fitting and there was a good variety of shots used in the performance.
I also got positive feedback on the narrative element of the music video. The general consensus was that the story was very entertaining and fitting of the songs genre. The whole idea of quitting the normal mundane life and going on a spiritual journey seemed to be most appropriate for the folk genre and they appreciated that the narrative linked to the songs title "It's a Job."
Some more positive feedback was given about the editing of the video. The use of black and white to represent boredom and colour to represent a happy fantasy seemed to be a good choice as it became clear what the conflict of the video was. They also liked the blurriness of the 'flashback' sequence as it was easy to understand that it was a flashback by the way it was edited.
Some negative feedback was given in regards to the mise-en-scene of the performance scenes. It was believed that the living room setting looked cheap and didn't fit the rest of the video. Luckily I was able to quickly re-film these scenes in an outdoor area which was agreed to be more appropriate and more aesthetically pleasing for the music video.
Monday, 19 March 2018
Constructing the Advert
Before making my advert I looked online for some inspiration and found two posters that I found interesting, the poster for the film "Toad Road" and a fan made poster for Bob Dylan, which are below:


I then took the picture below as a foundation for the advert:

I opened Photoshop in order to edit my advert, I made the canvas the size of an A4 sheet as that is the size I intended my poster to be:

After adding a rectangle to make the background green I added a pattern overlay effect. This pattern included leaves as it would link to the nature seen in my music video.

After this I added in the photo I took and cut around it, I then began by adding a colour overlay.

I went on to further edit the image in order to try and make it stand out more. I added the leaf pattern overlay again, to again link to my music video. I added a gradient overlay to the image which helped me by allowing me to apply gradient-based effects onto the image. After this I added an outer glow effect which I believe made the image more artistic. I then finally made the image blending mode a darker colour.

I added a border to the image which allowed me to put the band name and other information on the poster. The border was then added with the effect of stroke and colour overlay.
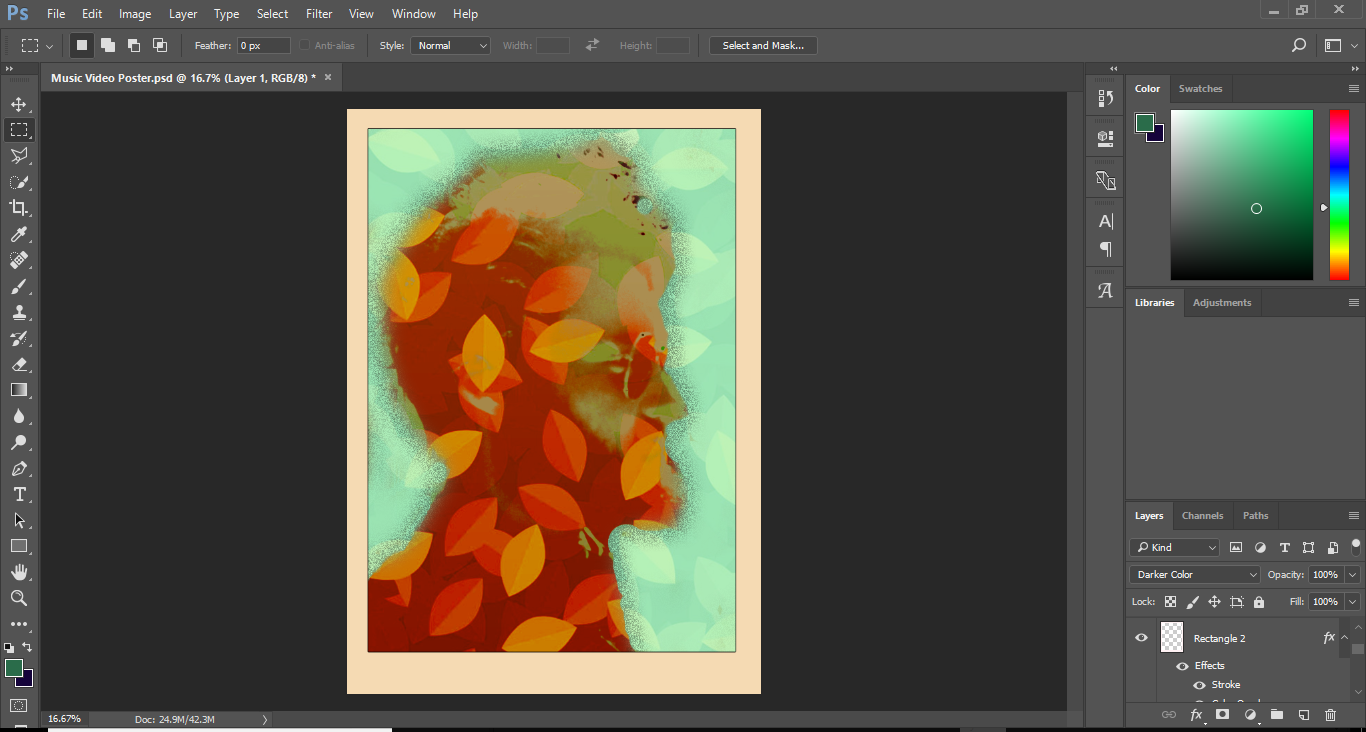
I added the band name and additional information to the top and bottom of the border, respectively. With the text I used the font 'Roboto', which I downloaded off DaFont.com, as I believed it suited the tone of my video.

Finally I added the title of the album to the advert. I made sure to make it stand out by having it right in the middle of the advert and in huge text size. I used the Bebas Neue font, which was again downloaded off DaFont.com, and applied the hard light effect to the text

Sunday, 18 March 2018
Constructing the Digipak
When making my digipak I first searched online for inspiration. I decided that I would emulate a Guy Davis album cover, a Johnny Cash album cover (as it would be a good way to get pictures of the artist) and the title screen for the video game 'The Last of Us' as it fit into the theme of nature that was featured in my video.


I had many different pictures taken from a variety of angles and poses. Below is the ones I ended up using when making the digipak.


I then opened Photoshop to edit my pictures. I first decided to edit each one individually as I was able to focus more on one at a time.

I cropped the photo of the watch and cut around it to make my album cover. I chose this as the cover of the digipak as it links directly to a scene in my music video where the featured character throws his watch on the floor. After cutting around the image I then added a dirt texture background, linking back to the nature theme. I added a colour overlay effect as I believe that the watch was originally too colourful for the album. After finishing my editing of the image I added the band and album name in the Bell MT font, which, I believe, suited the album quite well.

I then decided to edit the back of my digipak. I cropped the photo to the appropriate size then cut around the image of me holding the guitar (which I used because it featured a big image of the artist). I then added a brown background. I used the match colour effect to match the colour of the digipak cover to make it look like one singular piece. I added a film grain filter as I believe it made the image feel more like it's indie genre. After this I got the real songs of the album online and copied onto the image with the Baskerville Old Face font.


For the next two images I again cropped the down to size and used match colour and film grain to help them feel like one piece.

I ended by doing the labels for the album. After getting the accurate measurements I got a wood texture background, fitting the genre and music video. I got the band and album name and typed it up with Baskerville Old Face.
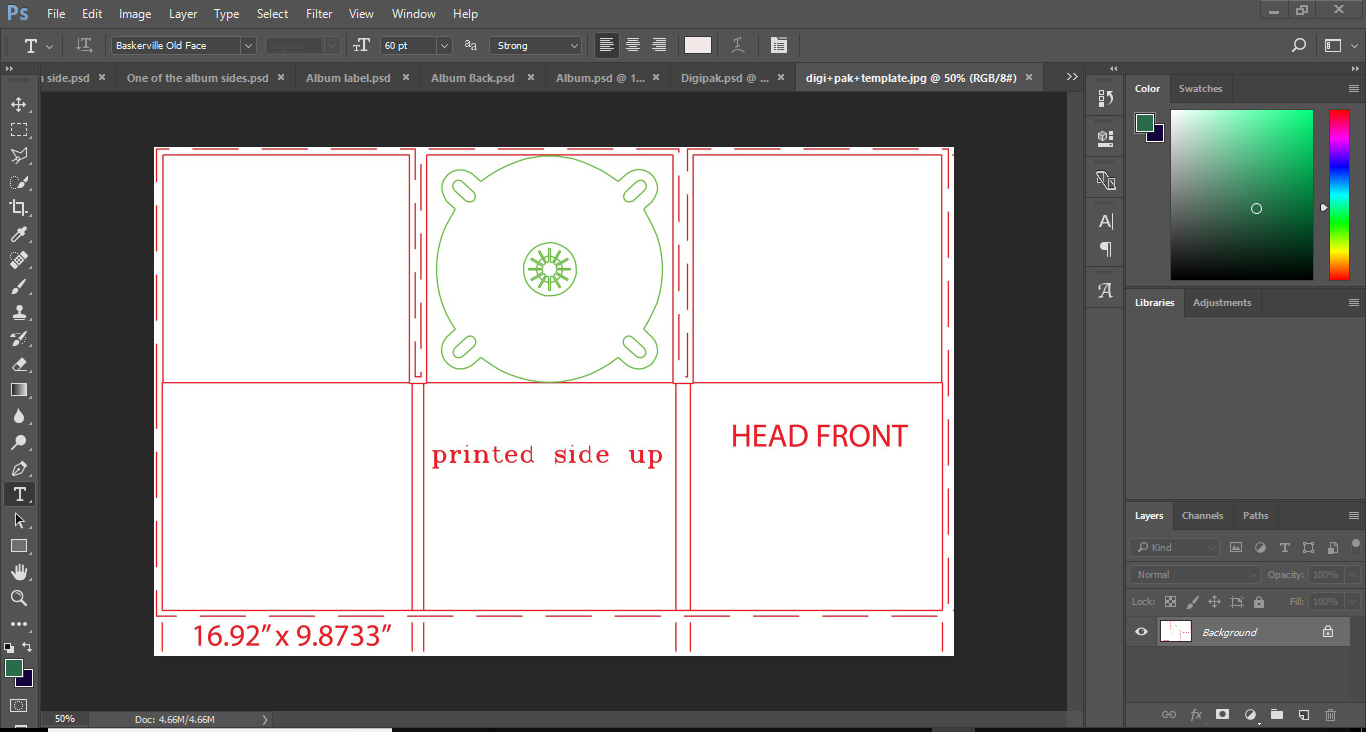
After finishing all the images I got a digipak template online to make sure my measurement were correct and to make sure I put all the images in the correct places.

Luckily my images were the correct size so I didn't need to make any additional adjustments. I had to put my cover and back next to each other and the top three layers had to be turned upside down as this is how an authentic digipak would look. I was then finished constructing my digipak.
Saturday, 17 March 2018
Music Video Rough Cut/Feedback
Here is my rough cut of the music video:
Feedback on the rough cut:
 After showing the music video to a small group I gave them a link to a survey on SurveyMonkey in order to get feedback on my music video: Create your own user feedback survey
From the survey answers I found the following:
Pros:
Feedback on the rough cut:
From the survey answers I found the following:
Pros:
- Good Story
- Unique Effects
- Nice Varied Shots
- Most think the video fitted into the "folk" genre
Cons:
- Needs lip synching
- The scenes with the stock footage needs to be actually shot
- Tighter editing
- More editing 'to the beat'
From these answers I now know that I need to film some more scenes, specifically the lip syncing and the stock footage, and I need to spend more time editing.
Thursday, 15 March 2018
Editing the Music Video - Day 3

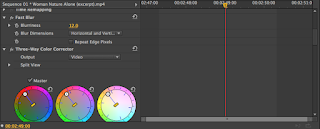
In this editing session I uploaded all the new footage that I filmed. Firstly since the scenes with the girl is meant to be a dream/flashback sequence I used various effects to give this idea. I added fast blur, which I increased by 12%, I then slowed the footage down by 50% to make it more dream-like and finally I used three-way colour corrector to have to footage have a more orange filter over it, creating a more warm mood.

Tuesday, 13 March 2018
Filming the Music Video - Day 4
In the final filming session I filmed the lip synching. I managed to get all the necessary props and thought about mise-en-scene before film, taking down posters. I had to memorise the lyrics and downloaded to song onto my phone to allow more accurate lip synching. I would have liked to film this session outside however the weather was too inconsistent to allow this.

Friday, 9 March 2018
Filming the Music Video - Day 3

After getting feedback on my music video I started to film more shots that was recommended by others. I filmed the shots of the girl dream/ flashback sequence that I originally used stock footage for. I had all the costume and props ready and knew where to film. There was also not an extreme amount to film so I was able to get the necessary footage and about an additional 5 minutes of useable footage as a back up.
Subscribe to:
Comments (Atom)

-
I originally came up with some ideas for my video of the song 'It's a Job,' by the band Wolfie's Just Fine. I was inspired ...

